.svg)

Why Boaters Are Building Electric Outboards Themselves
A diy electric outboard motor is a hands-on conversion project where you replace a traditional gas powerhead with an electric motor, controller, and battery system, while keeping the original lower unit and propeller. For many boaters, it is a practical way to test electric propulsion on a small scale before committing to a commercial system.
Here is what the project typically involves:
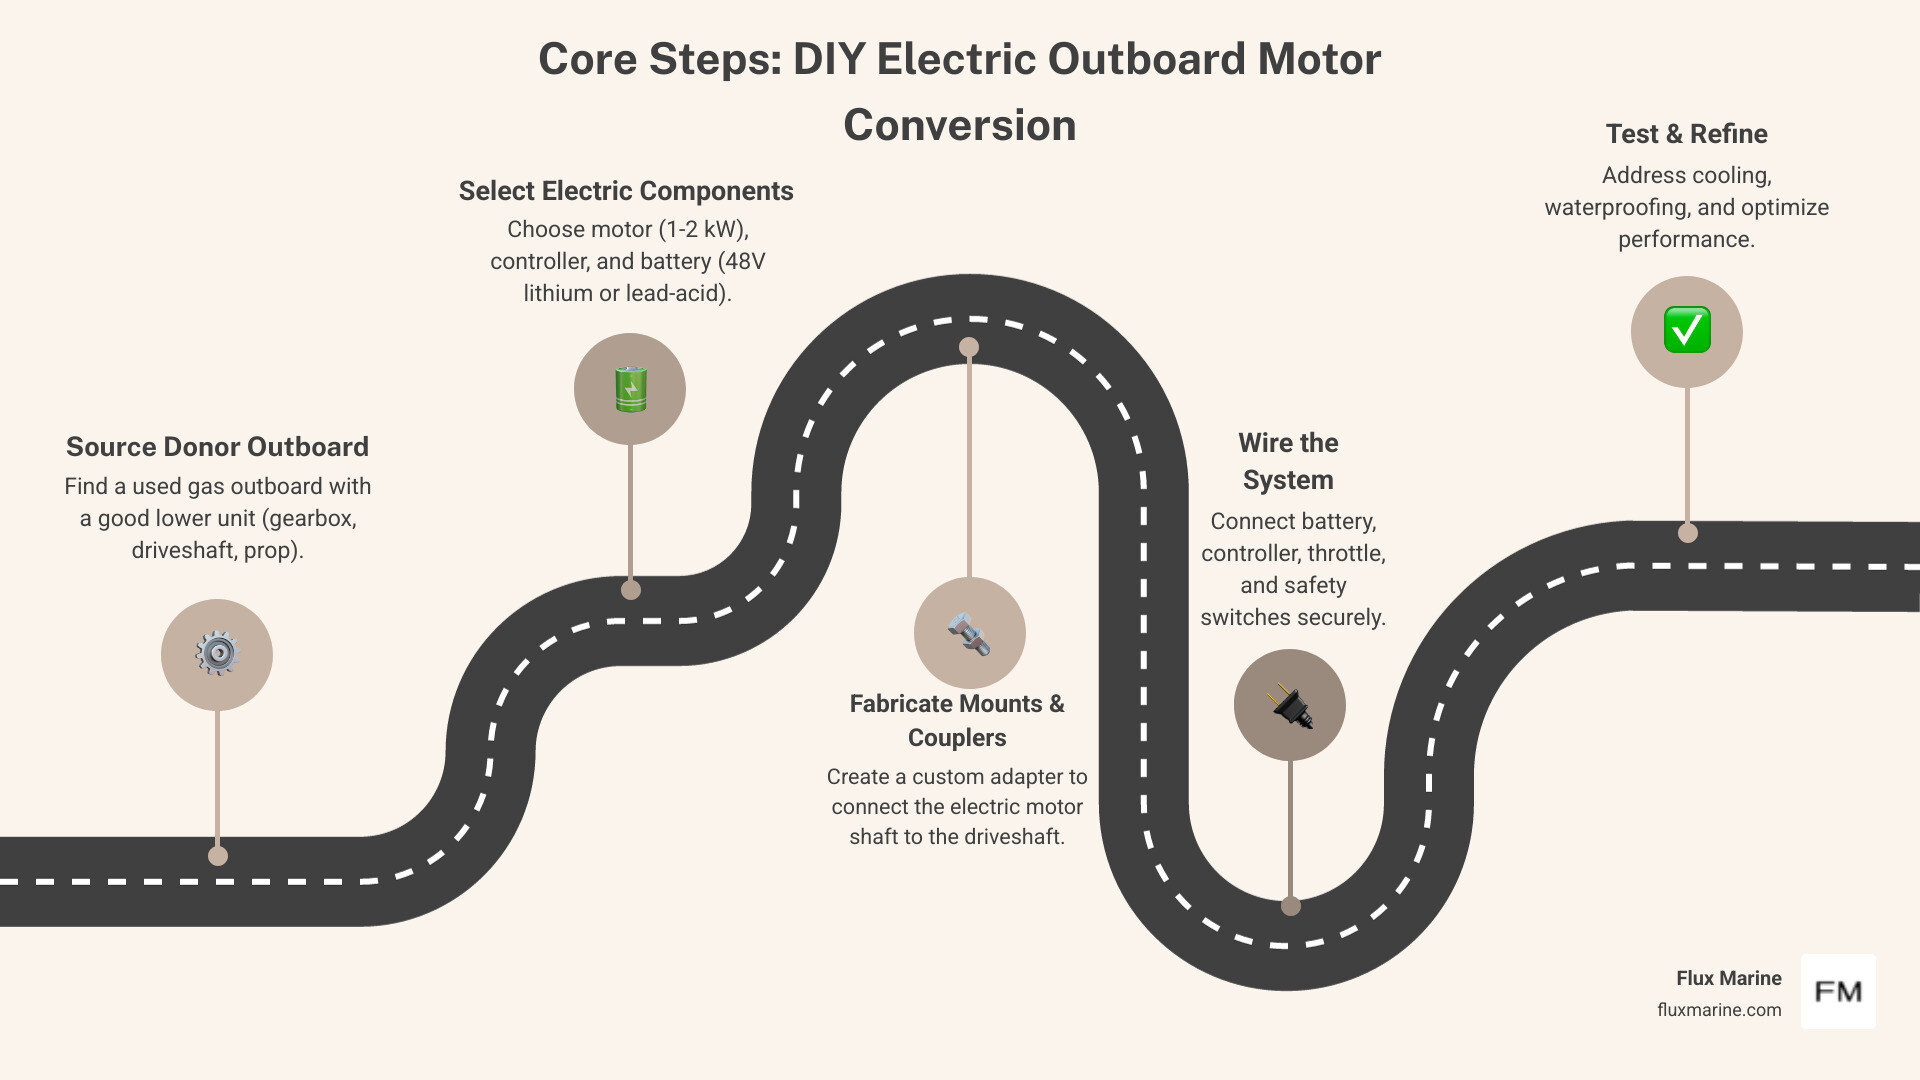
Core Steps:
- Source a donor outboard – Find a used gas outboard with a good lower unit (gearbox, driveshaft, prop)
- Select electric components – Choose a motor (typically 1–2 kW), controller, and battery (often 48V lithium or lead-acid)
- Fabricate mounts and couplers – Create a custom adapter to connect the motor shaft to the outboard's driveshaft
- Wire the system – Connect battery, controller, throttle, and safety switches
- Test and refine – Address cooling, waterproofing, and performance issues
Typical Cost: Around $600–$1,000 in parts, plus several weeks of work
Key Challenge: Mechanical alignment, electrical integration, and cooling management
Over the past decade, dozens of DIY enthusiasts have documented electric outboard conversions, using everything from repurposed lawn mower motors to salvaged EV components. The motivations are consistent: quiet operation, zero emissions at the point of use, and the satisfaction of building something yourself.
Those same projects also reveal the real engineering challenges behind electric marine propulsion. Cooling systems can be marginal. Controllers and low-cost components sometimes fail. Waterproofing is more difficult than it looks on paper. And performance often falls short of commercial units that have been engineered and tested as complete systems.
For typical low-speed cruising and light-duty use, the evidence is clear: a DIY build can work, provided you have mechanical skill, electrical knowledge, and patience for troubleshooting.
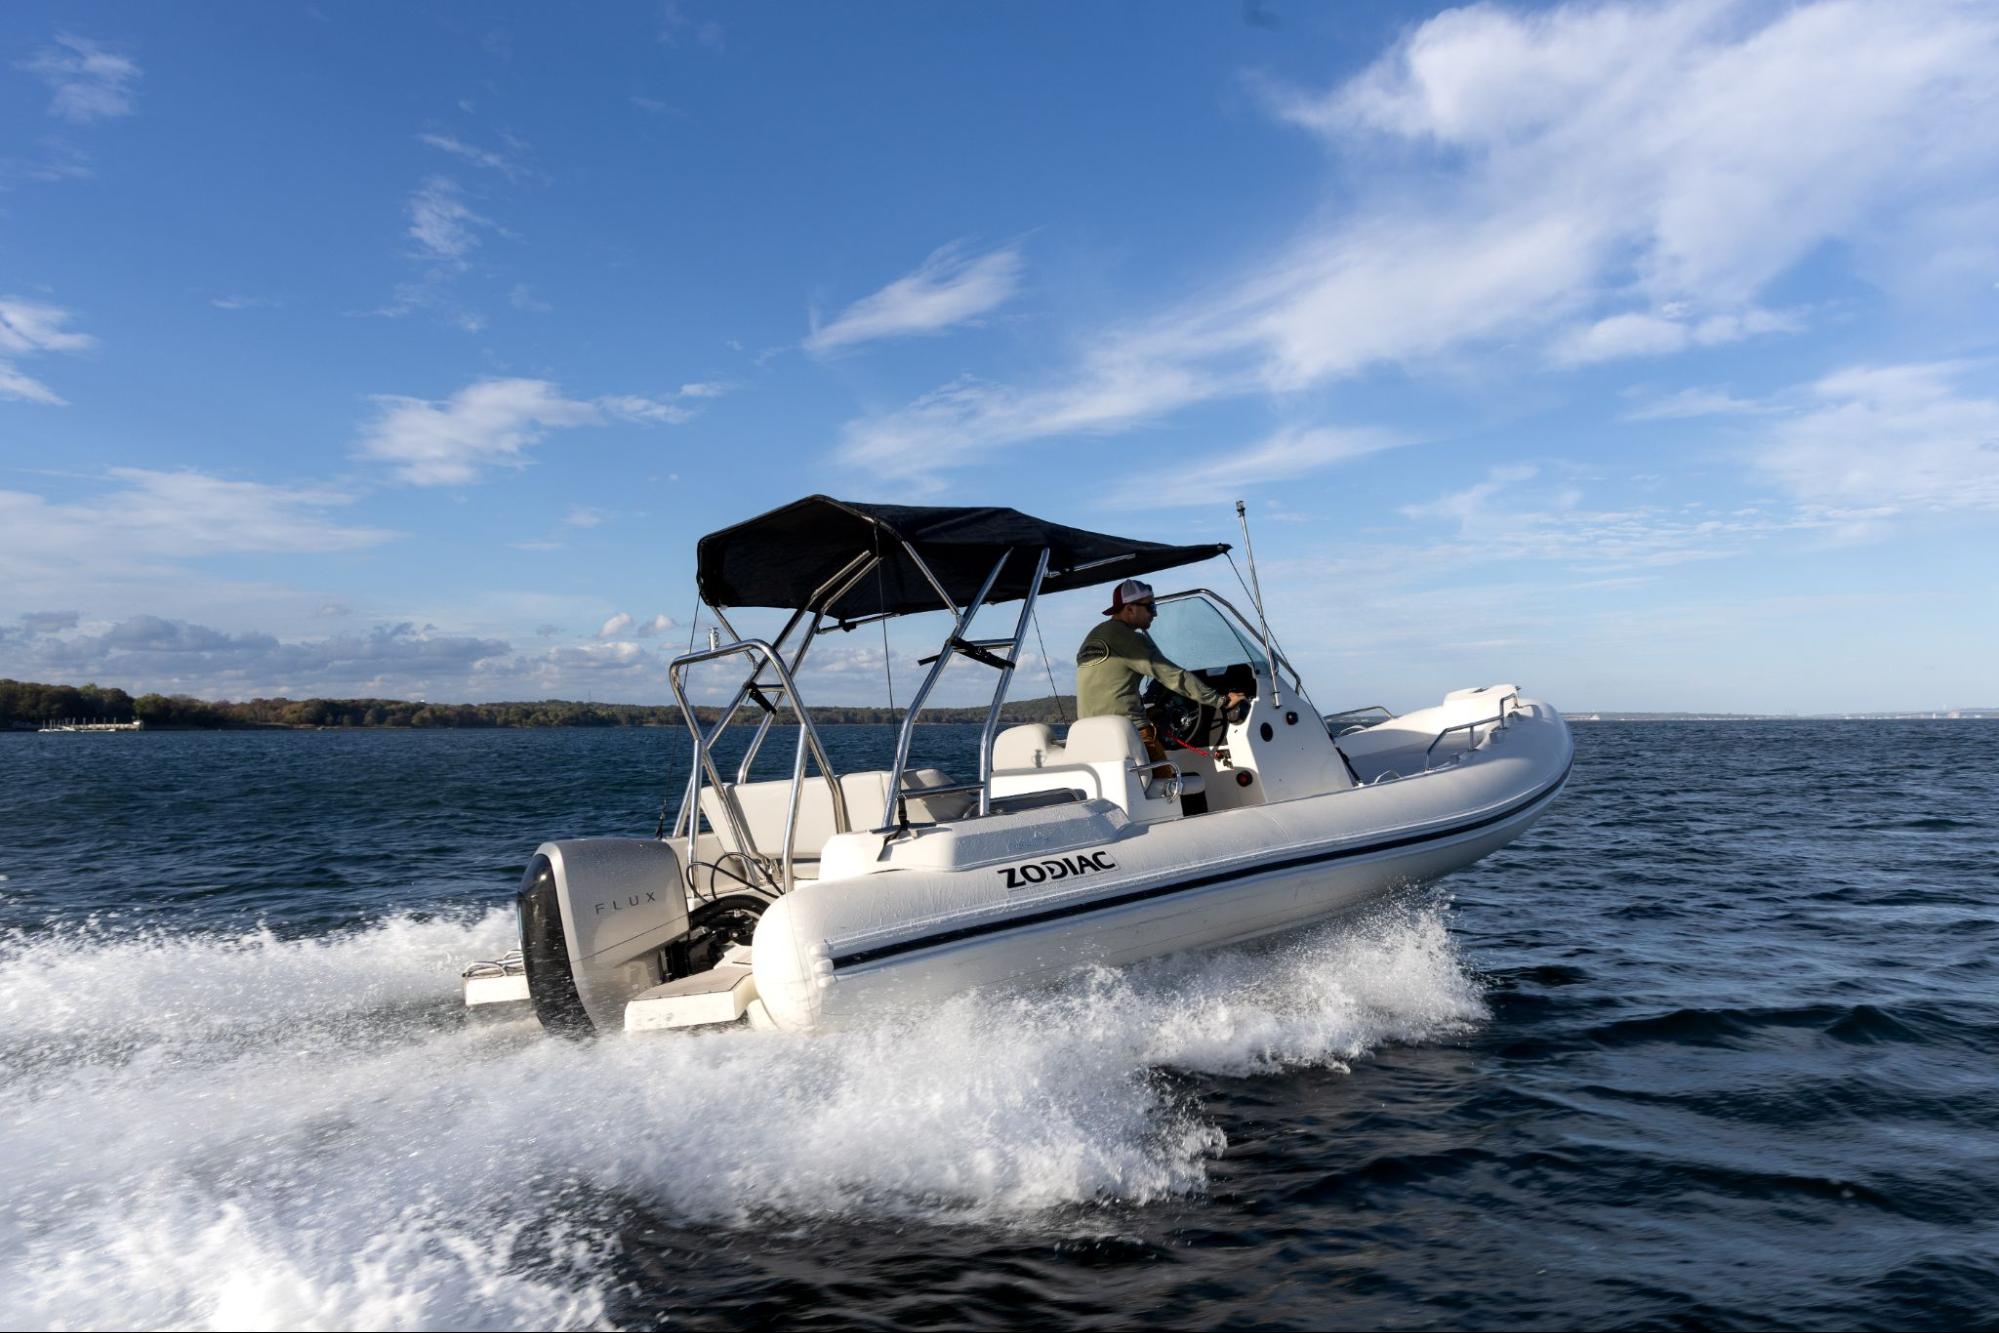
I'm Benjamin Sorkin, founder and CEO of Flux Marine, where we design high-performance electric outboards for recreational and commercial use. I started in a garage prototyping diy electric outboard motor systems before building the vertically integrated propulsion technology we manufacture today, so the trade-offs between DIY experimentation and professional integration are very familiar.
Why Build a DIY Electric Outboard Motor?
Before starting on a diy electric outboard motor project, it's crucial to clarify your goals and understand the inherent trade-offs between a self-built unit and a professionally engineered electric outboard. Our journey, and the experiences of many others, consistently points to a blend of personal satisfaction, cost-effectiveness, and environmental consciousness as primary drivers.
Motivations: Project Satisfaction, Customization, Learning, and Potential Savings
For many, the motivation to build a diy electric outboard motor is about the process itself. The satisfaction of taking a project from concept to completion is immensely rewarding. This hands-on approach allows for customization unattainable with off-the-shelf products, letting you tailor power output, controls, and aesthetics to your needs.
These projects are also fantastic learning opportunities in mechanical engineering, electrical system design, and marine propulsion. This knowledge is invaluable as electric boating technology advances. One builder noted their desire for a system "more powerful than the cheap trolling motors, but much cheaper than equivalent commercial units," highlighting the dual motivation of performance and value.
Cost Considerations: DIY vs. Commercial
A primary driver for a diy electric outboard motor is potential cost savings. Here’s a general comparison:
- New Gas Outboards: A small 2-6 hp gas outboard typically costs $1,000–$2,000, plus ongoing expenses for fuel and maintenance.
- Commercial Electric Outboards: Professionally engineered systems offer a premium experience but can cost several thousand dollars, with high-power models and batteries reaching $5,000 or more.
- DIY Electric Outboard Motor: A self-built project often lands in the $600 to $1,000 range. A 1.8-kW brushless motor and controller might cost around $230, a flexible coupler about $36, and a used donor outboard for its lower unit can often be found for under $100.
While the initial outlay for a DIY build is lower, it's important to factor in your time, the cost of tools, and potential for unexpected expenses during troubleshooting.
Environmental Impact: Cleaner, Quieter Boating
The environmental benefits of a diy electric outboard motor are undeniable. By eliminating gasoline combustion, you reduce noise pollution and remove exhaust emissions at the point of use. This means no oily sheens on the water, no fumes, and a quieter experience for boaters and marine life. This aligns perfectly with our vision at Flux Marine for a cleaner, quieter industry.
Electric outboards also require less maintenance, as there are no spark plugs, fuel filters, or carburetors to service. This reduces the consumption of petroleum-based products. If your batteries are charged using renewable energy, the environmental footprint is reduced even further.
Project Scope: Skills, Time, and Tools
Undertaking a diy electric outboard motor project demands a solid understanding of mechanical and electrical principles. You'll need mechanical skills for disassembly, fabrication, and alignment, and electrical skills for safely wiring the high-current system.
Expect to invest several weeks of work, including research, fabrication, assembly, and testing. Access to a workshop with tools like drills, saws, a soldering iron, and a multimeter is essential. While challenging, the journey offers a profound educational experience.
Core Components: What You’ll Need
Selecting the right motor, battery, and controller forms the backbone of your diy electric outboard motor. These choices directly impact performance, range, reliability, and safety. Each component must be chosen with the harsh marine environment in mind.
Choosing an Electric Motor for Your DIY Outboard
The electric motor is the heart of your conversion. Its characteristics dictate the power, efficiency, and overall complexity of your system.
- Motor Types:
- Permanent Magnet DC (PMDC) Motors: Simpler and cheaper, these motors use brushes that require maintenance. Cooling can be challenging as heat is generated internally. They are controlled with straightforward Pulse Width Modulation (PWM) controllers.
- Brushless DC (BLDC) or Permanent Magnet AC (PMAC) Motors: More efficient, quieter, and lower maintenance, these are the preferred choice for high-performance diy electric outboard motor projects. They are easier to cool and allow for more precise control, though their controllers are more complex. A 1.8-kW BLDC motor and matched controller can be acquired for around $230.
- Repurposed Industrial Motors: Motors from lawnmowers or golf carts can be cost-effective but require significant adaptation and may not be suited for a marine duty cycle.
- [TABLE] Comparing BLDC vs. PMDC Motors
FeaturePermanent Magnet DC (PMDC)Brushless DC (BLDC) / Permanent Magnet AC (PMAC)EfficiencyLowerHigherCostGenerally lowerGenerally higherMaintenanceRequires brush replacement, generates electrical noiseBrushless, quieter, lower maintenanceControl ComplexitySimpler PWM controllersMore complex controllers, often integrated with sensorsCoolingMore challenging due to internal heat generationEasier, as heat-generating coils are stationaryTypical UseTrolling motors, smaller DIY projectsHigher power DIY projects, commercial electric outboards
- Key Specifications:
- Power Rating (kW): A 1-2 kW motor is a common starting point.
- Voltage (V): Must match your battery system (e.g., 48V).
- RPM: Consider the motor's RPM relative to your lower unit's gear ratio.
- Torque (Nm): Higher torque at lower RPMs is generally better for marine use.
- Sourcing: Electric vehicle parts suppliers and industrial surplus stores are good sources for motors and controllers.
Selecting the Battery and Controller
The battery system is your energy reservoir, while the controller acts as the brain, managing power delivery and ensuring safe operation.
- System Voltage: We recommend a 48-volt system for diy electric outboard motor projects in the 1-2 kW range. This keeps current below 40 amps, allowing for manageable 10 or 12 AWG battery cables. A 12-volt system delivering the same power would draw over 90 amps, requiring much heavier and more expensive 1 AWG cables. The ABYC Wire Size Calculator is an invaluable tool for proper wire sizing. While 48V is not a high-shock risk, the high current can cause dangerous arcing, so safe work practices are critical.
- Battery Chemistry:
- Flooded Lead-Acid: The cheapest option, but they are heavy, require maintenance, and have a short cycle life.
- AGM (Absorbed Glass Mat): Maintenance-free and spill-proof, but still heavy and more expensive than flooded lead-acid.
- Lithium Iron Phosphate (LiFePO4 or LFP): The preferred choice for their high capacity, low weight, and excellent cycle life (thousands of cycles). Despite a higher initial cost, their long lifespan makes them cost-effective.
- Battery Capacity (Ah): This determines your runtime. To estimate your needs, consider the motor's power consumption (Watts) and desired duration. For example, a 1kWh battery at 48V is about 20Ah. If your motor draws 19 amps, a 50 Ah battery could provide roughly 2.5 hours of runtime.
- Motor Controllers: The controller must be matched to your motor's type and voltage. Key features include PWM control, appropriate current/voltage ratings, throttle input (0-5V), and safety interlocks for emergency stop switches.
Mechanical and Electrical Assembly: The Conversion Process
This is where you adapt the donor outboard, fabricate custom mounts, couple the electric motor to the driveshaft, and wire the system. Precision, attention to detail, and a strong emphasis on safety are paramount.
Mechanical Adaptation and Coupling
The most significant mechanical challenge in a diy electric outboard motor conversion is creating a robust, perfectly aligned connection between your electric motor and the donor outboard's driveshaft.
- Donor Outboard: Select an old gas outboard with a failed powerhead but a good lower leg (gearbox, driveshaft, prop shaft). Strip down the outboard, remove the gas engine, and inspect and service the gearbox, including changing the gear oil. Salvaging a lower unit with a working F-N-R transmission is ideal.
- Motor Mounting: The electric motor must be securely mounted above the lower unit on a custom transition plate, often made from 1/2-inch aluminum. T-slotted aluminum extrusion is another option that offers adjustability without welding. Perfect alignment with the driveshaft is critical to prevent excessive wear and component failure.
- Driveshaft Coupling: Connecting the motor shaft to the driveshaft is a critical step. A jaw-type flexible coupling (like a Lovejoy coupler) is a popular choice, as it accommodates minor misalignment and absorbs shock. These are available with different bore sizes and cost around $30-$40. For splined shafts or unique dimensions, you may need to source or fabricate a custom-machined splined adapter, which might require help from a local machine shop.
Electrical Wiring and Controls
The electrical system for your diy electric outboard motor must be designed for safety, reliability, and ease of operation. Working with high-current DC systems demands careful planning.
- Wiring Diagram: Before connecting anything, create a detailed wiring diagram showing the path from the battery to the controller and motor. Include all fuses, relays, and contactors. Use appropriately sized cables (e.g., 10 or 12 AWG for a 48V system) and corrosion-resistant wire.
- Throttle Control: The original twist-grip tiller can often be repurposed to operate a linear potentiometer (5k-10k ohm), which provides a 0-5V signal to the motor controller. Hall effect twist-grip throttles from electric bikes are another common and reliable option.
- Safety Systems: These are non-negotiable. Install a heavy-duty battery disconnect switch near the battery bank. Protect all power lines with appropriately rated fuses or circuit breakers. An emergency stop switch or kill cord is essential for immediate shutdown. Always use insulated tools and proper safety gear, as high-current systems can create dangerous arcs.
- Customization: A key benefit of a diy electric outboard motor is custom integration. An Arduino microcontroller can be used to monitor motor temperature, battery voltage, and current draw on a small display. With a Bluetooth module, you can even implement remote control features.
Performance, Challenges, and Maintenance
A diy electric outboard motor offers a unique boating experience, distinct from both gasoline and professionally engineered electric units. While rewarding, it comes with its own set of performance characteristics, common challenges, and maintenance considerations.
Common Issues and Solutions
DIY projects are rarely straightforward; they are iterative processes of building, testing, and refining.
- Cooling: This is a primary challenge, especially with repurposed air-cooled motors.
- Air Cooling: Simple solutions include removing the motor cover or adding cooling fans (e.g., a 48V muffin fan). Some builders use temperature-controlled fans for more active cooling.
- Water Cooling: More advanced solutions involve custom water-cooling loops. This can be done by routing water from a small pump through copper tubing coiled around the motor housing. Always monitor motor and controller temperatures, as they can reach 80°C or higher under load.
- Waterproofing: Protecting electrical components is critical. Use IP67-rated enclosures for sensitive electronics and carefully seal all connections, cable entries, and seams. Whenever possible, choose marine-grade components.
- Component Reliability: Sourcing cheap components can lead to issues. Be prepared to replace initial parts like speed controllers with more robust models. Always use quality chargers and never leave charging unattended. Propeller selection is also key and often requires experimentation to match the electric motor's torque characteristics.
Performance and Limitations
A diy electric outboard motor provides a unique boating experience, but it's important to set realistic expectations.
- Benefits: The most celebrated advantages are quiet operation, instant torque from the electric motor, and significantly reduced routine maintenance compared to a gas engine.
- Limitations: DIY builds often don't match the optimized efficiency of professionally engineered systems. Top speed and range vary widely based on the boat, build quality, and battery capacity. For displacement hulls, power consumption increases with the cube of boat speed. Long-term durability, especially waterproofing, can be a concern with repurposed components.
Maintenance Checklist for DIY Electric Outboards
Even though electric motors require less maintenance than gas engines, a diy electric outboard motor still needs regular attention.
- Routine Checks: Regularly inspect all electrical connections for tightness and corrosion. Check that all fasteners on mounts and couplers are secure. Inspect all seals and gaskets to ensure waterproofing is maintained.
- Gearbox Service: The lower unit's gearbox requires periodic maintenance. Change the lower unit oil as recommended by the donor outboard's manufacturer.
- Battery Care: Follow the manufacturer's recommendations for charging your specific battery chemistry. If using an LFP battery bank, ensure your Battery Management System (BMS) is properly balancing the cells.
Conclusion: DIY Satisfaction vs. Professional Integration
Building a diy electric outboard motor is a profoundly rewarding and educational project for those with the time, mechanical aptitude, and electrical knowledge. It offers the unique satisfaction of creating a functional, quiet, and emission-free propulsion system custom to specific needs. These projects provide invaluable real-world learning about the intricacies of electric propulsion, from motor selection and battery management to mechanical integration and thermal challenges.
However, the journey of building a diy electric outboard motor also highlights the significant engineering, rigorous testing, and seamless integration required to produce a reliable, high-performance marine product. The challenges encountered in cooling, waterproofing, and component reliability underscore the value of systems designed from the ground up for the harsh marine environment. While a DIY build can be cost-effective for niche applications, it often involves trade-offs in terms of overall efficiency, consistent performance, and long-term durability when compared to purpose-built commercial solutions.
At Flux Marine, we've taken the lessons learned from early prototyping and the broader DIY community to engineer electric propulsion systems that deliver on the promise of electric boating without compromise. Our focus is on providing a powerful, efficient, sustainable, and enjoyable boating experience, making ownership easier and contributing to a cleaner, quieter industry in locations like Rhode Island, Florida, Virginia, New York, and New Jersey.
For boaters who prioritize turnkey performance, comprehensive warranty support, and professional integration, exploring advanced electric propulsion solutions is the logical next step.
- Project Summary: DIY electric outboards are a testament to ingenuity, offering deep learning and personal satisfaction. Yet, they also reveal the complex engineering behind robust marine electric propulsion.
- Learn how Flux Marine’s electric propulsion technology delivers professional-grade performance
Learn how Flux Marine’s electric outboards compare to DIY and gas alternatives. Explore our technology and see real-world performance.

.jpg)